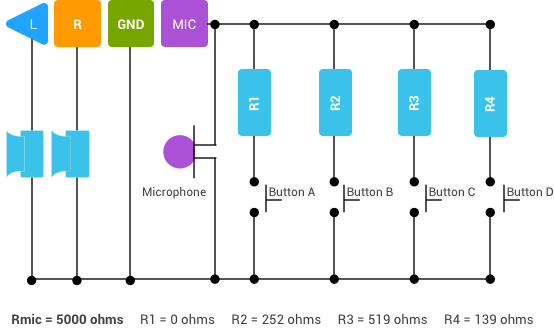
You can use the headphones (wired or bluetooth) to control some function of the app, for example during automotive recording you can press a button on the headphones and have a flag on the graph at the time of button press to remember the time when an event occured.
You can use commercial headphones (with buttons) or you can make a custom cable with up to 4 buttons.
Button functions are configurable in HScope.
Configuring button functions in HScope
In HScope Settings (General Settings) you can associate buttons from Keyboard or Headphones buttons to HScope functions.
Build a custom cable
You can have a simple headphone cable with a single button or can have a console wih up to 4 buttons. Here is the schematic to implement up to 4 buttons with an headphone cable (speakers and microphone are not required). More informations here.
You can use bluetooth keyboard and mouse to control the app for example on televisions or screens with Android TV Boxes. Here is the list of keys you can use to control some of the functions:
Here are the new features developed in 2021/2022 (users with the last license purchase before 2021 can activate these features through the Update 2021/2022 in the License panel).
With this update you are going to keep/get all the provious updates:
Before the acquisition start in the the Automotive Module, now it is possible to bring to Zero the probe offset.
2. White Theme
High visibility white theme for outdoor measurements.
3. Math Channel in Automotive Module
Automotive Module now support the Math Channel both on recorded or loaded waveforms.
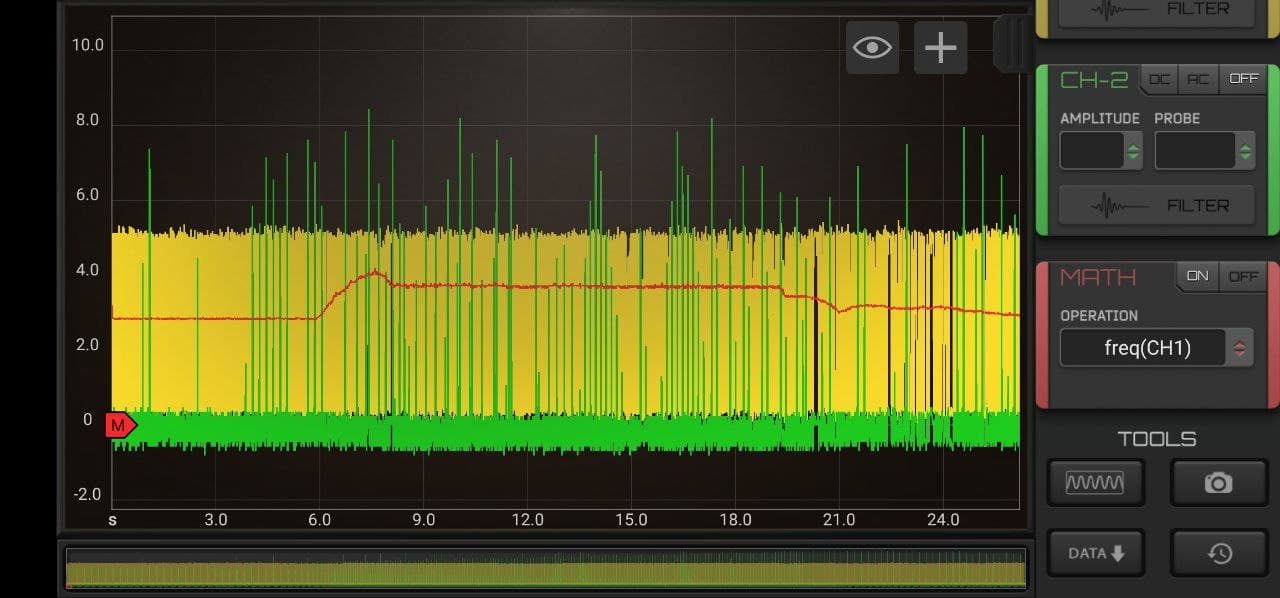
4. Math Channel Freq Function
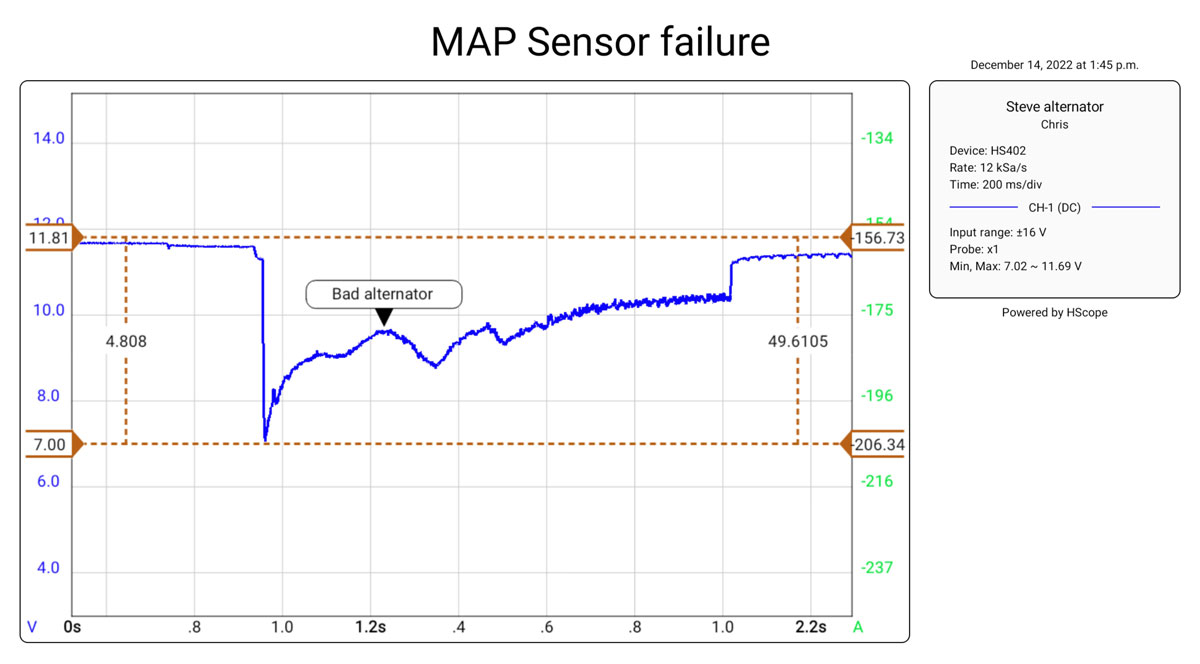
New function to compute the instant waveform frequency. Following is a sample of frequency change (in Red) with air flow from MAF sensor (which changes with engine speed).
5. Audio Module WAV Import
Audio Module can now import WAV files and analyse them in HScope, process and export again as WAV.
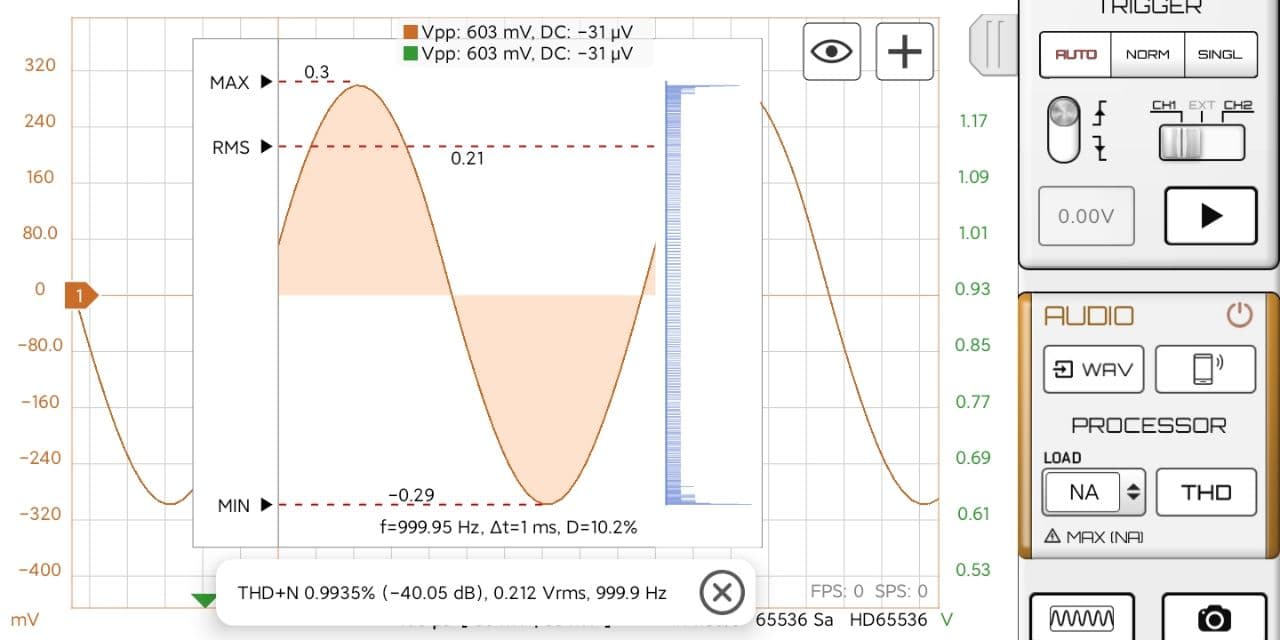
6. Audio Module THD Processor
Audio Module can now calculate the (Total Harmonic Distortion + Noise) THD+N of an acquired file or an imported file.
7. Automotive Module Memory Upgrade
Now you can configure the allocated RAM for Automotive Module so to use your phone full potentials!
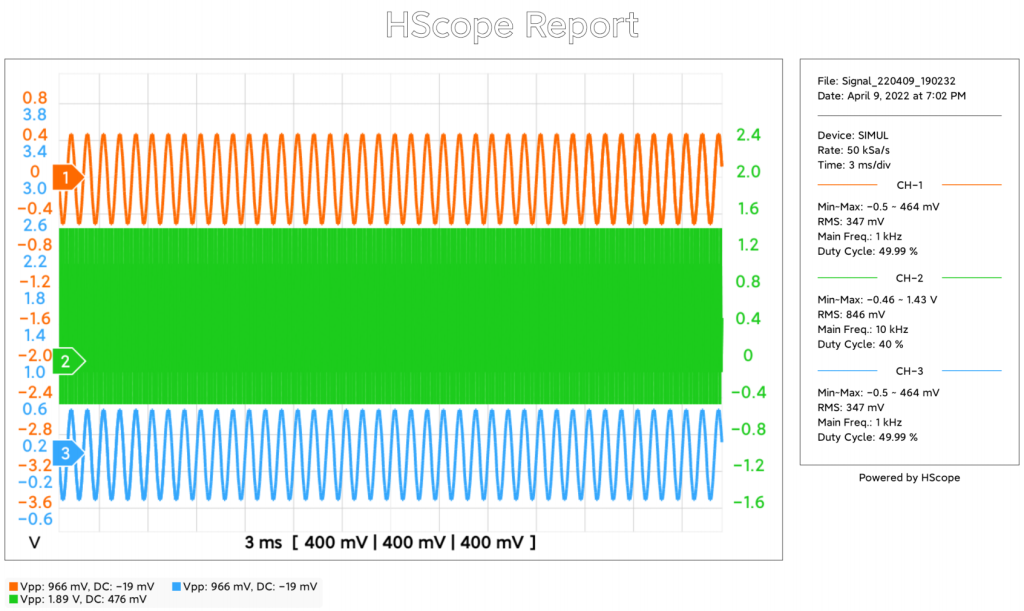
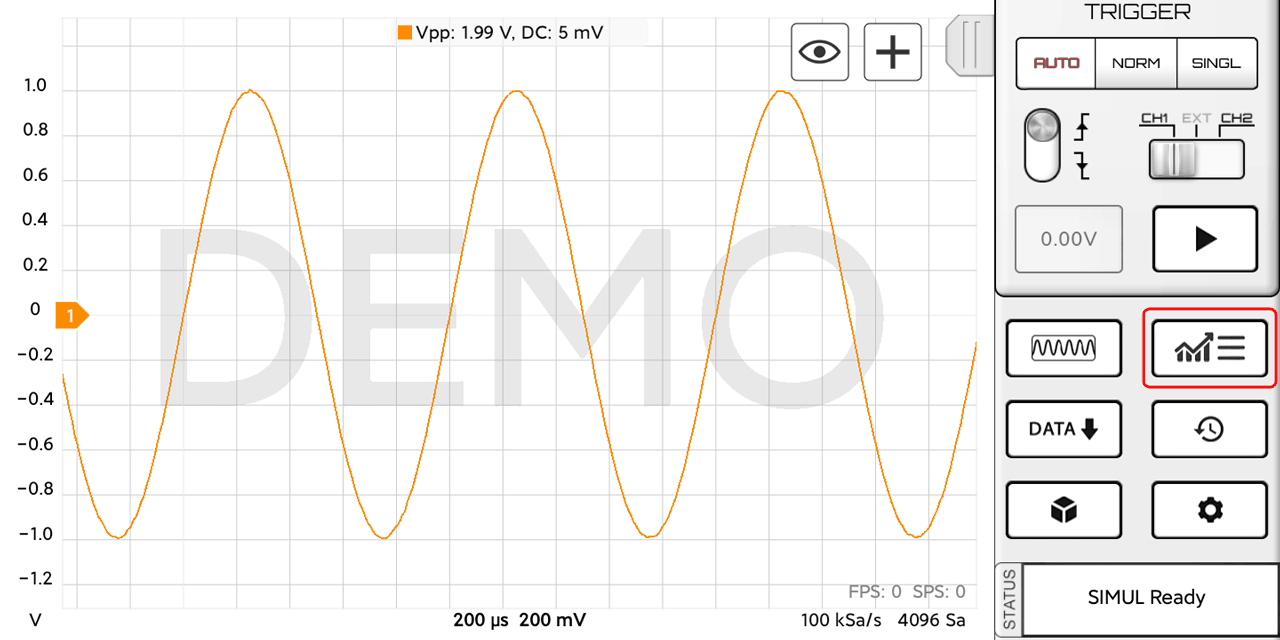
8. PDF Report
In Oscilloscope mode the Screenshot button produce a PDF Report. The title is configurable.
Any person (user) accessing to Martinloren® websites or using HScope™ app is subject to, and agrees to, the terms and conditions set out in this legal notice. If the user does not wish to be bound by these terms and conditions, the user may not access, display, use or download and/or otherwise copy or distribute content obtained at these websites nor use the HScope™ app.
Use and copyright
Use of Martinloren® websites, and any related services, content or applications contained therein or offered thereon is at the sole risk of the user.
Users may view, copy, download to a local drive, print and distribute the content of this website, or any part thereof for non-commercial, informational or reference purposes only, unless explicit consent of the author.
Users may not cede, sub-license or otherwise transfer any rights they may have under these terms and conditions or which may otherwise have been obtained through the use of this site.
Users who wish to use content from this site for commercial purposes may only do so with the prior written permission obtained by sending an email to support@martinloren.com.
Any reproduction and/or copy of the content or portion thereof for commercial purposes must include the following copyright notice in its entirety
All moral rights and any other rights of other legal entity in respect of which content is contained on this site not expressly granted, are reserved.
Data Ownership
The user agree to cede to Martinloren® cloud platform the right to use, maintain and redistribute the waveform data shared or uploaded to HScope™ Cloud service.
Intellectual property rights
All content, data and trademarks, including, but not limited to, software, technology, databases, know-how, text, graphics, icons, hyperlinks, private information, designs, program, publication, product, process, or idea described in this website may be the subject of other rights, including other intellectual property rights, which are the property of or licenced to Martinloren®.
Third party websites are welcome to link to the information that is hosted on these pages.
It is expressly prohibited for any person, business, entity or website to frame any page on this website, including the home page, in any way whatsoever, without the prior written approval of Martinloren®.
Amendments to content and information
The website owner expressly reserves the right in its sole discretion to affect any amendment or alteration to the content and information set out in this website.
Users acknowledge that it is their responsibility to familiarise themselves with any amendment or alteration affected.
Updating and maintenance of these Terms and Conditions of Use
Martinloren® reserves the right to modify, add to or remove from portions or the whole of these terms and conditions of use from time to time.
It is the user’s obligation to periodically check these terms and conditions of use at this website for updates.
The user’s continued use of Martinloren® websites, apps and services following the posting of pages or updates will be considered notice of the user’s acceptance to abide by and be bound by these terms and conditions of use, including such pages or updates.
Check if your oscilloscope is supported in the list here.
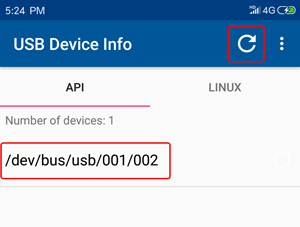
Check if your phone OTG work with the app USB Device info. After connecting the oscilloscope you should see this:In case you cannot see the oscilloscope with this app it won’t work with HScope. Possible reasons (check next questions for resolution):
OTG cable is not good (see next question)
Original oscilloscope USB cable too long / not suitable (some user got it working by replacing the USB cable)
Phone has not enough power for the oscilloscope
Phone USB OTG is disabled (hope not)
My OTG cable has issues?
Your OTG cable may have issue if:
Oscilloscope is not detected
Connection is unstable, the oscilloscope connect and disconnect during usage
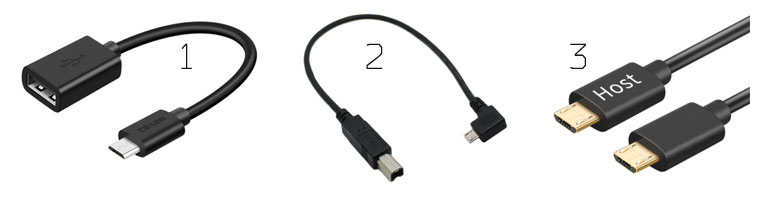
The suggested OTG cables are as following:
Flexible USB OTG cable (both from micro-usb or from usb type-c)
Short OTG cable from micro-usb to USB-B (used in most oscilloscopes)
Short OTG cables from micro-usb (Host goes to phone) to micro-usb (for HS10X DIY oscilloscopes)
Enable USB OTG on my phone
Read this if you already tested your oscilloscope / OTG cable on another phone so you are sure it is a phone related issue.
So one specific phone do not support USB OTG. Solutions:
Some phone like some Huawei and Realme smartphones need to turn on USB OTG in the Android settings (go to the Settings -> Additional Settings and switch on the OTG connection)
Need to enable OTG on the Android system. This procedure need first to root the phone, then you can edit an xml file as described here.
(for Huawei users) Android Settings > Developer Options > Always prompt when connecting to USB (need to disable this one)
Motorola Moto G Power 5g-2024: the USB on this phone has 4 options for data connectivity and one option for ‘No Data Transfer’ apparently used for charging only. Place in ‘No Data Transfer’ the phone connects with data transfer and powers the HS5x2 with no problems.
It has been found that USB OTG can be deactivated on Android phone (until a fresh restart) when this happen:
USB port goes in electrical protection (too much power requested). For example for Hantek 6074 is suggested to us a special USB Type-C adapter that can power both the tablet and the oscilloscope (available models here), giving OTG functions. DO NOT use Hantek original double cable to power the oscilloscope since new USB Type-C port deactivate the OTG function when detect direct power from the USB port, putting the tablet in charging mode.
USB device has some wrong usb configuration. A software data error can bring USB freezing on older Android versions (found on Android 4.4 and Android 6, not visible on Android 9).
Scrolling is not smooth
Some user experienced problems with scrolling, the scrolling position is stuck or the scrolling is not smooth. This is due to some phone model that have problems with the touch screen while the phone is charging due to instability of power supply.
To check this issue just enable the Developer options in Android, enable the option to show the taps on screen and/or the tap coordinates. Then you will see that when the phone is charging on the screen it detect wrong taps positions.
To avoid this issue on these phones just do not operate the App when the phone is charging.
2 Licensing
What’s the license cost
1. Base oscilloscope license fee is set by Google according to the oscilloscope model, your country currency, and promotions. Generally it is around 10% of the oscilloscope cost (gross).
2. Additional module licenses depends from the feature and may vary from 6 to 25$.
3. Every year you can get the updates when available, with an yearly fee about 6$. This fee cover all updates both on basic features and also on additional modules.
*These prices are indicative at Jan 2023 and they may be subjected to variation.
License options
You can buy HScope licenses on Google Play Store on on Huawei App Gallery.
In case your Android device have none of them, Huawei App Gallery is the most simple option to install.
Huawei AppGallery app store is fairly lightweight and can be installed on any Android device (tested on Android 5 and higher). It can be an excellent drop replacement for Google Play Store especially for devices without Google Play services, such as DAPs (iBasso DX series, Fiio M series and etc.) or devices distributed in Mainland China. Huawei are extremely strict with app submission and verification process, so trash apps will not go through the review process that makes Huawei AppGallery more safer in terms of distributed app quality in comparison with Google Play Store.
HScope is distributed via Huawei AppGallery app store too and is available in most of the countries.
To install Huawei AppGallery app store:
Download Huawei AppGallery’s apk directly from Huawei.
Find downloaded apk (for example appgallery_10.0.0.305.apk) with File Manager and tap on it to start installation.
Once installed you need to download and install Huawei Mobile Services (HMS) apk (it is available in Huawei App Store or anywhere in the Internet – search for phrase: Huawei Mobile Services apk) and install it.
Start Huawei AppGallery, it will likely try to self-update, proceed with updates if necessary.
Create Huawei ID account (similar to Google or Apple or Blackberry ID) via Huawei AppGallery or via Huawei’s web site and you are ready to go!
Where to purchase the full version in the app?
Scroll down the menu of buttons on the right and click on the Settings icon. You can see the License panel where you can buy the specific oscilloscope license and also additional modules.
Module licenses are charged 1 time and are valid for all oscilloscope models.
Can I use my license on other phones?
According Google licensing policy licenses belong to a Google Account and not to a specific android device. Whatever device (even future) where you set the same google account as primary account and synchronised with Google will get the same licenses.
What’s the license validity
At January 2022 HScope licenses (Oscilloscope base license and additional Modules license) are charged 1 time and keep unlimited validity. When you buy a license you can use all the features provided by that license plus free updates for the new features released within 1 year from the purchase.
New features released 1 year after the last license purchase date will require to purchase an yearly update which will provide all the features up to the current date, plus free updates for the new features released within 1 year from the purchase date of the update.
3 Beta Experiments & New Features
Join us on TELEGRAM!
HScope LOUNGE – Meet other practitioners, mechanics, electricians and engineers and share practices and experiments.
HScope AUTOMOTIVE – After you enter the main channel (LOUNGE) you can find on the top pinned message the link for the automotive group with specific topics and discussions.
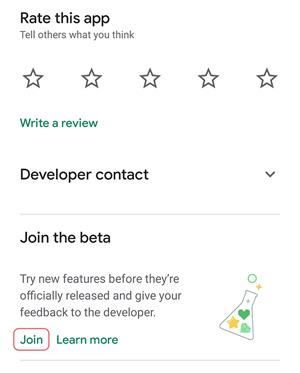
Join the Beta
Beta version of the app includes latest add-ons to be tested by a small group. This version of the app may be not stable and still need the license to work. Progresses are tracked here.
To enable the Beta, go on Google Play, open HScope page, then push the Join button. Once activated the Beta you will see the possibility to update the app (it may require some time).
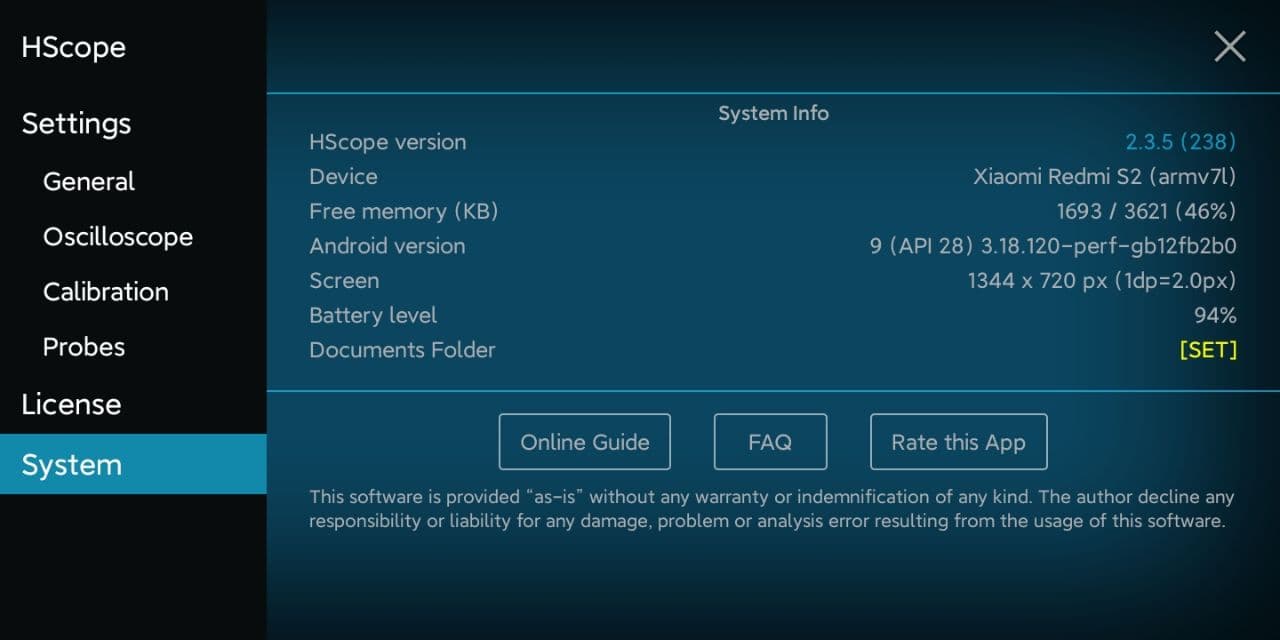
In the System Settings you can see your device information.
System Panel
Set the Documents Folder (Android 10+)
You need to set the Documents Folder in order to save the app configurations and waveform data safely in a public folder of your phone.
Case 1: First HScope Installation
You can create and select this folder in your Documents or Download folder (ie. HScope under /Documents/). After creating the app data folder just select it and confirm.
Case 2: HScope app upgrade
Select the existing HScope folder under /Downloads/ or /Documents/. Follow the procedure in this Guide under Introduction → Android 10+.
Change log
Click on the HScope version number to open the information about the latest app release.
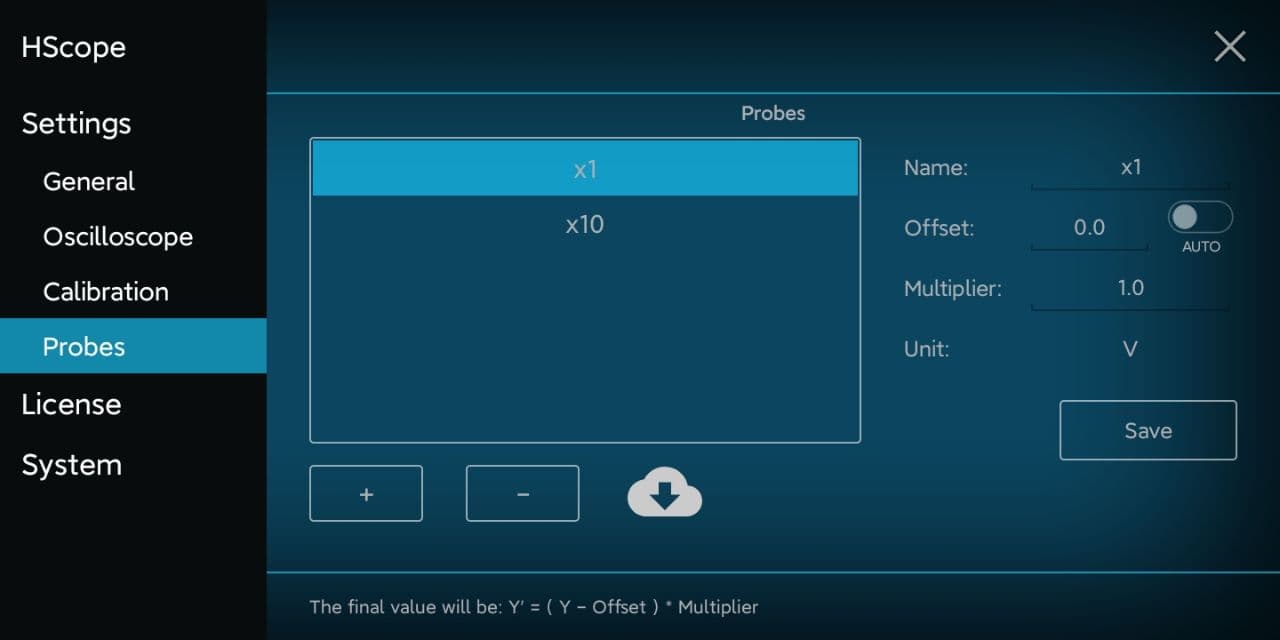
You can add, remove, configure or import probes in the Settings → Probes panel.
Probe Settings Panel
Select a probe from the list to see and change the probe settings (on the right).
Click on “+” button to add manually a new probe.
Click on “–” button to delete a selected probe.
To calculate the values for a new probe you can try this online tool.
Backup Your Probes
You can find a backup of your probes configuration in the Documents Folder selected in Settings → System. The backup file is called Probes.cfg (ie. /Download/HScope/Probes.cfg). HScope will automatically save the probes configuration on this file.
Warning: in case you don’t have selected a Documents Folder in Settings → System then this automatic backup won’t work.
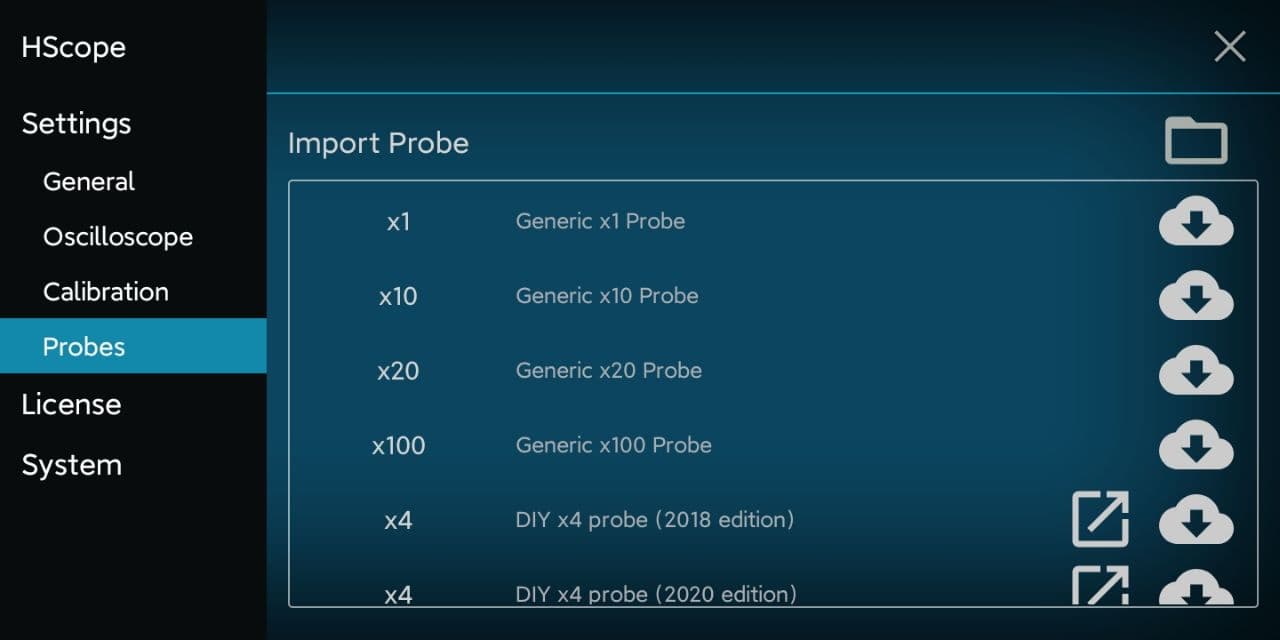
Import / Download Probes
Click on the Cloud icon to access the Import Probe screen. Here you can import probes configurations from a probe backup file or from the cloud.
Import Probe Screen
Import from File
Click on the folder icon on top/right of the screen to load a saved Probes.cfg file. You can also have renamed this file (ie. Probes_2021.cfg). The important for this file is that it end with .cfg extension.
Only new probes will be imported, if a probe already exists with the same name it won’t be imported.
Download from Cloud
On the list you can download single probe configurations from common brands or DIY probes.
Click on the cloud download icon to get the probe configuration.
DIY probes are available in the cloud list with link to instruction how to build it. In case of DIY probes you can click on the arrow icon and open the page for the probe building.
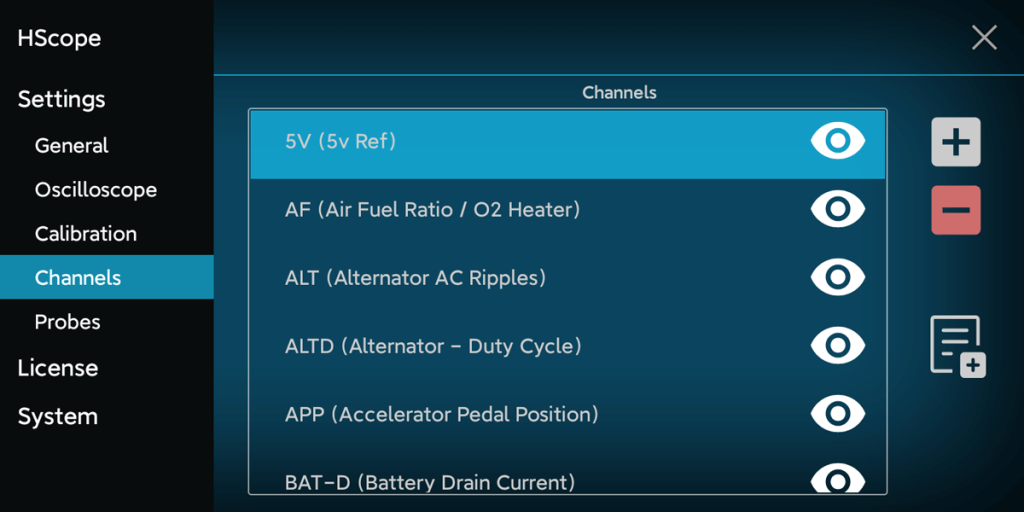
In Settings → Channels you can see the available names that can be assigned to the oscilloscope channels. Set a specific name for a channel is just a self reminder for the visualized data. No function is associated with the Channel naming.
If you don’t use some channel name of them you clicking on the eye and hide it.
You can add or remove custom names with the + and – buttons. You can remove only custom names previously created.
When you modify this list HScope saves the current configuration in a file called Channel_Names.cfg under your HScope document folder.
By clicking on the document icon with the + on you can import a custom names list from file (from example a configuration saved on another phone).
Calibration parameter are showed and can be adjusted just when the oscilloscope is connected on the phone.
1. Factory Reset
Set the calibration parameters according the calibration data stored in the oscilloscope (it works just for few models, check this possibility in the oscilloscope specific webpage).
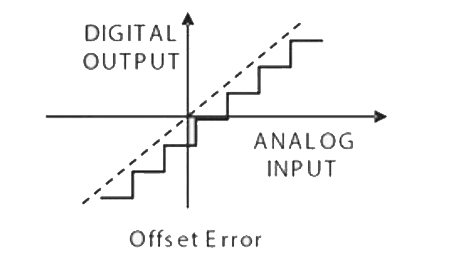
2. Calibrate Zero Level (or Offset)
Allow to set the output to 0V when the probe is connected to its ground. It practically reduce the offset error.
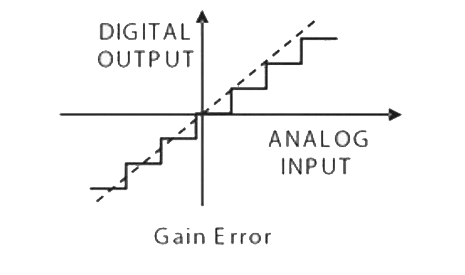
3. Calibrate Multiplier (or Gain)
Allow to reduce the gain error of the oscilloscope, by using an accurate reference voltage. You can also repeat this procedure with different reference voltages. In this case, for each channel, start from lower reference voltages to higher ones.
First it is necessary to calibrate the Zero Level, then the Multiplier Factor
4. Reset
Reset the calibration data.
5. Load
Load the calibration data from a file.
6. Save
Save the calibration data to a file.
For each channel is possible to calibrate the Zero Level (b) (so that when the probe is connected to the GND the result of the measure is 0 Volts) and the Multiplier factor (m). Assuming the ADC measured values are on a straight line the Multiplier factor allow to adjust the inclination of the ADC line according the equation y=(x+b)m. First it is necessary to calibrate the Zero Level, then the Multiplier Factor.
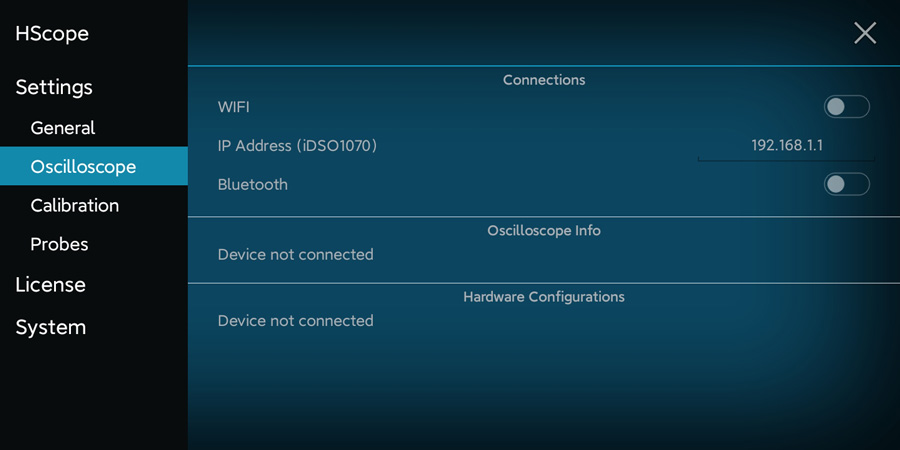
Here you have the settings related the oscilloscope and you can see the oscilloscope information (when connected).
Connections
Enable the WiFi or Bluetooth connection in case you have these kind of oscilloscope. If not disable them so the app would not search on these networks.
The IP Address (WiFi) configuration is currently used only for iDSO1070 oscilloscope in case the user assign a custom IP address to this device in the WiFi network.
Oscilloscope Info
Here you can see the hardware information when the oscilloscope is connected. This screen is refreshed in real-time.
Hardware Configurations
Here you can set additional oscilloscope hardware configurations, according the oscilloscope capabilities.
We use technologies like cookies to store and/or access device information. We do this to improve browsing experience and to show personalized ads. Consenting to these technologies will allow us to process data such as browsing behavior or unique IDs on this site. Not consenting or withdrawing consent, may adversely affect certain features and functions.
Functional
Always active
The technical storage or access is strictly necessary for the legitimate purpose of enabling the use of a specific service explicitly requested by the subscriber or user, or for the sole purpose of carrying out the transmission of a communication over an electronic communications network.
Preferences
The technical storage or access is necessary for the legitimate purpose of storing preferences that are not requested by the subscriber or user.
Statistics
The technical storage or access that is used exclusively for statistical purposes.The technical storage or access that is used exclusively for anonymous statistical purposes. Without a subpoena, voluntary compliance on the part of your Internet Service Provider, or additional records from a third party, information stored or retrieved for this purpose alone cannot usually be used to identify you.
Marketing
The technical storage or access is required to create user profiles to send advertising, or to track the user on a website or across several websites for similar marketing purposes.
 Guide
Guide
 In case you cannot see the oscilloscope with this app it won’t work with HScope. Possible reasons (check next questions for resolution):